Wednesday, March 30, 2016

Out of memory in Android Studio

Hi,
I am here with the solution of an error of Android Studio which i faced today and a lot of time and energy of mine, So i am publishing this for all of you so that you could not face problem like me.

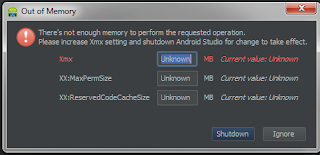
Out of memory Error.

Screen shot of the error is as follows :


To Solve this error you just need to go to : 
/Applications/Android\ Studio.app/Contents/bin/studio.vmoptions and increase MaxPermSize as per your requirement as shown below.
-Xms128m
-Xmx4096m
-XX:MaxPermSize=1024m
-XX:ReservedCodeCacheSize=200m
-XX:+UseCompressedOops

Friday, March 25, 2016

Change or Replace Fragments Inside ViewPager

MainActivity.java

package android.zafar.viewpager;

import android.os.Bundle;
import android.support.v4.app.Fragment;
import android.support.v4.app.FragmentManager;
import android.support.v4.app.FragmentPagerAdapter;
import android.support.v4.view.ViewPager;
import android.support.v7.app.ActionBarActivity;

/**
 * Example about replacing fragments inside a ViewPager. I'm using
 * android-support-v7 to maximize the compatibility.
 *
 * @author Zafar Imam
 *
 */
public class MainActivity extends ActionBarActivity {

// For this example, only two pages
static final int NUM_ITEMS = 2;

ViewPager mPager;
SlidePagerAdapter mPagerAdapter;

@Override
protected void onCreate(Bundle savedInstanceState) {
super.onCreate(savedInstanceState);
setContentView(R.layout.activity_main);

/* Instantiate a ViewPager and a PagerAdapter. */
mPager = (ViewPager) findViewById(R.id.pager);
mPagerAdapter = new SlidePagerAdapter(getSupportFragmentManager());
mPager.setAdapter(mPagerAdapter);

}

/* PagerAdapter class */
public class SlidePagerAdapter extends FragmentPagerAdapter {
public SlidePagerAdapter(FragmentManager fm) {
super(fm);
}

@Override
public Fragment getItem(int position) {
/*
* IMPORTANT: This is the point. We create a RootFragment acting as
* a container for other fragments
*/
if (position == 0)
return new RootFragment();
else
return new StaticFragment();
}

@Override
public int getCount() {
return NUM_ITEMS;
}
}


}

Then Create Three different Fragments As :

FirstFragemt.java

import android.os.Bundle;
import android.support.v4.app.Fragment;
import android.support.v4.app.FragmentTransaction;
import android.view.LayoutInflater;
import android.view.View;
import android.view.View.OnClickListener;
import android.view.ViewGroup;
import android.widget.Button;

public class FirstFragment extends Fragment {

private static final String TAG = "FirstFragment";

@Override
public View onCreateView(LayoutInflater inflater, ViewGroup container,
Bundle savedInstanceState) {
// Inflate the layout for this fragment
View view = inflater.inflate(R.layout.first_fragment, container, false);

Button btn = (Button) view.findViewById(R.id.btn);

btn.setOnClickListener(new OnClickListener() {

@Override
public void onClick(View v) {
FragmentTransaction trans = getFragmentManager()
.beginTransaction();
/*
* IMPORTANT: We use the "root frame" defined in
* "root_fragment.xml" as the reference to replace fragment
*/
trans.replace(R.id.root_frame, new SecondFragment());

/*
* IMPORTANT: The following lines allow us to add the fragment
* to the stack and return to it later, by pressing back
*/
trans.setTransition(FragmentTransaction.TRANSIT_FRAGMENT_OPEN);
trans.addToBackStack(null);

trans.commit();
}
});

return view;
}


}

SecondFragment .java

import android.os.Bundle;
import android.support.v4.app.Fragment;
import android.support.v4.app.FragmentTransaction;
import android.view.LayoutInflater;
import android.view.View;
import android.view.View.OnClickListener;
import android.view.ViewGroup;
import android.widget.Button;


public class SecondFragment extends Fragment {

private static final String TAG = "SecondFragment";

@Override
public View onCreateView(LayoutInflater inflater, ViewGroup container,
Bundle savedInstanceState) {
// Inflate the layout for this fragment
View view = inflater
.inflate(R.layout.second_fragment, container, false);

Button btn = (Button) view.findViewById(R.id.btn);

btn.setOnClickListener(new OnClickListener() {

@Override
public void onClick(View v) {
FragmentTransaction trans = getFragmentManager()
.beginTransaction();
trans.replace(R.id.root_frame, new StaticFragment());
trans.setTransition(FragmentTransaction.TRANSIT_FRAGMENT_OPEN);
trans.addToBackStack(null);
trans.commit();
}
});

return view;
}


}


StaticFragment.java

import android.os.Bundle;
import android.support.v4.app.Fragment;
import android.view.LayoutInflater;
import android.view.View;
import android.view.ViewGroup;


public class StaticFragment extends Fragment {

private static final String TAG = "StaticFragment";

@Override
public View onCreateView(LayoutInflater inflater, ViewGroup container,
Bundle savedInstanceState) {
// Inflate the layout for this fragment
View view = inflater
.inflate(R.layout.static_fragment, container, false);

return view;
}

}

Then create a root fragment which contains Framelayout as

RootFragment.java

import android.os.Bundle;
import android.support.v4.app.Fragment;
import android.support.v4.app.FragmentTransaction;
import android.view.LayoutInflater;
import android.view.View;
import android.view.ViewGroup;


public class RootFragment extends Fragment {

private static final String TAG = "RootFragment";

@Override
public View onCreateView(LayoutInflater inflater, ViewGroup container,
Bundle savedInstanceState) {
/* Inflate the layout for this fragment */
View view = inflater.inflate(R.layout.root_fragment, container, false);

FragmentTransaction transaction = getFragmentManager()
.beginTransaction();
/*
* When this container fragment is created, we fill it with our first
* "real" fragment
*/
transaction.replace(R.id.root_frame, new FirstFragment());

transaction.commit();

return view;
}

}


Now create the respected layout files for each one as : 

activity_main.xml
<RelativeLayout xmlns:android="http://schemas.android.com/apk/res/android"
    xmlns:tools="http://schemas.android.com/tools"
    android:layout_width="match_parent"
    android:layout_height="match_parent"
    tools:context=".MainActivity" >

    <android.support.v4.view.ViewPager
        xmlns:android="http://schemas.android.com/apk/res/android"
        android:id="@+id/pager"
        android:layout_width="match_parent"
        android:layout_height="match_parent" />
</RelativeLayout>


first_fragment.xml
<RelativeLayout xmlns:android="http://schemas.android.com/apk/res/android"
    xmlns:tools="http://schemas.android.com/tools"
    android:layout_width="match_parent"
    android:background="#d6b90512"
    android:layout_height="match_parent" >

    <TextView
        android:id="@+id/tv"
        android:layout_width="match_parent"
        android:layout_height="match_parent"
        android:gravity="center_horizontal"
        android:padding="10dp"
        android:textAppearance="?android:attr/textAppearanceLarge" 
        android:textColor="#fff"
        android:text="Fragmet One" />
    <Button 
        android:id="@+id/btn"
        android:layout_height="wrap_content"
        android:layout_centerInParent="true"
        android:layout_width="wrap_content"
        android:text="@string/to_second_fragment"/>

</RelativeLayout>


second_fragment.xml
<RelativeLayout xmlns:android="http://schemas.android.com/apk/res/android"
    xmlns:tools="http://schemas.android.com/tools"
    android:layout_width="match_parent"
    android:layout_height="match_parent"
    android:background="#d6b90512">

    <TextView
        android:id="@+id/tv"
        android:layout_width="match_parent"
        android:layout_height="match_parent"
        android:gravity="center_horizontal"
        android:padding="10dp"
        android:textAppearance="?android:attr/textAppearanceLarge"
        android:textColor="#fff"
        android:text="Fragment Second" />
    <Button 
        android:id="@+id/btn"
        android:layout_height="wrap_content"
        android:layout_centerInParent="true"
        android:layout_width="wrap_content"
        android:text="@string/to_static_fragment"/>

</RelativeLayout>


static_fragment.xml
<RelativeLayout xmlns:android="http://schemas.android.com/apk/res/android"
    xmlns:tools="http://schemas.android.com/tools"
    android:layout_width="match_parent"
    android:background="#d6b90512"
    android:layout_height="match_parent" >

    <TextView
        android:id="@+id/tv"
        android:layout_width="match_parent"
        android:layout_height="match_parent"
        android:gravity="center_horizontal"
        android:padding="10dp"
        android:textAppearance="?android:attr/textAppearanceLarge"
        android:textColor="#fff"
        android:text="Static Fragment" />

</RelativeLayout>


root_fragment.xml
<FrameLayout xmlns:android="http://schemas.android.com/apk/res/android"
    xmlns:tools="http://schemas.android.com/tools"
    android:layout_width="match_parent"
    android:background="#000"
    android:layout_height="match_parent"
    android:id="@+id/root_frame" >

</FrameLayout>

Manifest.xml

<?xml version="1.0" encoding="utf-8"?>
<manifest xmlns:android="http://schemas.android.com/apk/res/android"
    package="android.zafar.viewpager"
    android:versionCode="1"
    android:versionName="1.0" >

    <uses-sdk
        android:minSdkVersion="8"
        android:targetSdkVersion="18" />
    <application
        android:allowBackup="true"
        android:icon="@drawable/ic_launcher"
        android:label="@string/app_name"
        android:theme="@style/Theme.AppCompat.Light.DarkActionBar" >
        <activity
            android:name="com.pineappslab.frcontainer.MainActivity"
            android:label="@string/app_name" >
            <intent-filter>
                <action android:name="android.intent.action.MAIN" />
                <category android:name="android.intent.category.LAUNCHER" />
            </intent-filter>
        </activity>
    </application>
</manifest>


Output Screen Shots :



Friday, March 11, 2016

Progress Bar with Custom Color

Create one xml folder in layout and put the my_progress.xml file in it .

my_porgress.xml
<?xml version="1.0" encoding="utf-8"?>
<rotate xmlns:android="http://schemas.android.com/apk/res/android"
    android:fromDegrees="0"
    android:pivotX="50%"
    android:pivotY="50%"
    android:toDegrees="360">
    <shape
        android:innerRadiusRatio="3"
        android:shape="ring"
        android:thicknessRatio="8"
        android:useLevel="false">
        <size
            android:width="76dip"
            android:height="76dip" />
        <gradient
            android:angle="0"
            android:endColor="#447a29"
            android:startColor="#447a29"
            android:type="sweep"
            android:useLevel="false" />
    </shape>
</rotate>

Set startColor and endColor as per your choice and 
Create a progress bar insile your main layout as 

<ProgressBar
  android:id="@+id/ProgressBar01" 
 android:layout_width="wrap_content"
 android:layout_height="wrap_content"
 android:background ="@layout/my_progress">


Thursday, March 10, 2016

WebView or WebViewClient with Fragment

package zafar.learnandroid.webviewdemo;

import android.annotation.SuppressLint;
import android.app.Fragment;
import android.os.Bundle;
import android.view.LayoutInflater;
import android.view.View;
import android.view.ViewGroup;
import android.webkit.WebView;
import android.webkit.WebViewClient;

public class MainFragmentActivity extends Fragment {
 WebView myWebView;
 final static String myBlogAddr = "http://learnandroidwithzafar.blogspot.in";
 String myUrl;
 public MainFragmentActivity() {
    }
 @SuppressLint("SetJavaScriptEnabled")
 @Override  public View onCreateView(LayoutInflater inflater, ViewGroup container,
                             Bundle savedInstanceState) {

        View view = inflater.inflate(R.layout.fragment_blog, container, false);
        myWebView = (WebView) view.findViewById(R.id.home_webview);

        myWebView.getSettings().setJavaScriptEnabled(true);
        myWebView.setWebViewClient(new MyWebViewClient());

        if (myUrl == null) {
            myUrl = myBlogAddr;
        }
        myWebView.loadUrl(myUrl);
        return view;
    }
private class MyWebViewClient extends WebViewClient {
@Overridepublic boolean shouldOverrideUrlLoading(WebView view, String url) {
            myUrl = url;
            view.loadUrl(url);
            return true;
        }
   }
}
Now Create xml layout as :
<?xml version="1.0" encoding="utf-8"?>
<RelativeLayout 
xmlns:android="http://schemas.android.com/apk/res/android"
    android:layout_width="match_parent"
    android:layout_height="match_parent">
    <WebView
        android:id="@+id/home_webview"
        android:layout_width="match_parent"
        android:layout_height="match_parent"
        android:layout_centerHorizontal="true"
        android:layout_centerVertical="true" />
</RelativeLayout>
Note: Don't Forget to give Internet permission in manifest file.

<uses-permission android:name="android.permission.INTERNET"/>

Screenshot


Tuesday, March 8, 2016

Smart Phones (Android) problems and their Solutions


Followings are some of the problems which we face with our smartphone 

1- Problem – Draining Battery
The issue of dealing with the draining battery of your smart phone is the most common and the most annoying one in the list. Most people using Android phones complaint about the battery getting drained too fast and about how they have to keep hunting for a charging point every now and then.

Solution – However, you can ensure an enhanced battery life for your Android phone by following certain simple rules. Tweak your phone’s location and brightness settings a bit. Keep the brightness to a level that is comfortable for your eyes. And turn off location GPS services when you don’t need them. Run your phone on Battery Saving mode to make your phone run for a little longer. Switch off any unnecessary apps.

2- Problem – Slow User Interface and Issue of Hanging
Another big issue of Android smart phones is the issue of hanging. This usually occurs because of lack of storage capacity.

Solution – You can always save yourself from the annoying hanging issue of your Android phone by creating storage space on your phone. It is recommended that you should transfer your apps to your micro SD card and delete the apps that aren’t used by you. Also, you must not make much use of live wallpapers and remove cache from all apps. This would create space o your cell and prevent it from hanging.

3- Problem – Trouble Connecting
Many times it gets difficult to connect to your Bluetooth or even your basic cellular network.

Solution – The connectivity problem has an easy solution. All that you need to do is to turn on the Airplane mode for a period of 30 seconds and then, switch it off. This will help you connect to Bluetooth and also works in case of unresponsive network. In case, it doesn’t work this means there is some issue with your Bluetooth device that you are trying to connect to.

4- Problem – Syncing issue
Sometimes it gets difficult to sync between applications online. This syncing error is quite a common problem with Android phones.

Solution – You must ensure that you are connected to the Internet and that your password is correct. If issue persists, try deleting the account and then adding it back.

5- Problem – Crashing Apps
Haven’t you seen an error saying ‘the app crashed’? This error message can occur due to many reasons.

Solution – Check that you are running the latest Android OS and that your phone is fully updated. You may also close the app and then re-launch it. Or, try re-installing the app from the Google Play Store.

6- Problem – Battery is not getting charged.
This is another common issue about Android phones.

Solution – Check that you have the switch on. Ensure that the charging socket is providing power. Check the cable, it might be damaged. If nothing works, may be, it is time to take your phone to the service center.

7- Problem – Unresponsive screen
Sometimes your phone’s screen may become unresponsive to any touch. This may occur if you have dropped your phone somewhere or if your phone gets splashed with water.

Solution – Try restarting your Android phone. In case it doesn’t work, chances are that you have damaged your phone and it needs to be taken to the service center.

8- Problem – Issue connecting to WiFi
This can happen many times because of several different reasons.

Solution – Ensure that you are entering the right password. Ensure that your phone is not in the Airplane mode. Try restarting the WiFi router. Restart the phone and try again.

9- Problem – High RAM consumption
Solution – Clear all cache for apps and delete the apps that you no more use. This will help clear some space and burden from your RAM. Use apps like Clean Master and App Cache Cleaner for automatically doing this for you.

10- Problem – Your phone gets wet in rain.
Solution – you should dissemble your phone taking out the cover, the battery, memory card and SIMs out of it. Place all of these components of your Android device in a big bowl of rice. The rice grains will naturally absorb all water and leave your phone dry in a few hours. You may assemble everything back and have your Android phone in working condition. If it doesn’t work, you’ll need to visit a service center.


These are the basic smartphones problem which happens with many of us.
Hope these solution will help you to handle your smartphone in convenient way.


Create Header and Footer in Android

Create Header and footer with the help of xml only :

    main.xml :

  <?xml version="1.0" encoding="utf-8"?>
<RelativeLayout 
   xmlns:android="http://schemas.android.com/apk/res/android"
  android:layout_width="fill_parent"
  android:layout_height="fill_parent">
    <!-- HEADER -->
    <include android:id="@+id/top_header"
       layout="@layout/layout_header"
        android:layout_alignParentTop="true" />
    <!-- FOOTER -->
    <LinearLayout 
       android:id="@+id/bottom_menu"
        android:layout_width="fill_parent"
       android:layout_height="wrap_content"
        android:layout_alignParentBottom="true"
        android:orientation="vertical">
        <!-- menu bar --> 
       <include layout="@layout/layout_footer_menu" />
    </LinearLayout>
   <!-- MAIN PART -->
    <LinearLayout 
       android:id="@+id/sub_content_view"
        android:layout_width="fill_parent"
       android:layout_height="fill_parent"
        android:layout_above="@id/bottom_menu" 
       android:layout_below="@id/top_header"
        android:layout_weight="1"
       android:background="#EAEAEA" 
       android:orientation="vertical"
        android:paddingBottom="5sp">
</LinearLayout>
</RelativeLayout>


    You can create your own header and footer layout and inflate inside the main xml layout with the help of <include /> tag in xml layout.
    ---------------------------------------OR---------------------------------------------
    You could create Header and footer using Relative layout as :

 <?xml version="1.0" encoding="utf-8"?>
<RelativeLayout
 xmlns:android="http://schemas.android.com/apk/res/android"
android:layout_width="match_parent"
android:layout_height="match_parent">
/* HEADER */
<RelativeLayout
    android:id="@+id/header"
    android:layout_width="match_parent"
    android:layout_height="50dp"
    android:layout_alignParentTop="true"
    android:background="#48fff7"
    android:paddingTop="8dp">
</RelativeLayout>
/* BODY */
<RelativeLayout
   android:layout_width="match_parent"
    android:layout_height="fill_parent"
    android:layout_above="@+id/footer"
    android:layout_below="@+id/header">
    <LinearLayout
        android:layout_width="wrap_content"
        android:layout_height="wrap_content"
        android:layout_marginLeft="5dp"
        android:layout_weight="0.8">
        <TextView        
        android:id="@+id/textView7" 
           android:layout_width="130dp"
            android:layout_height="wrap_content"
            android:layout_gravity="center_vertical"
            android:paddingLeft="10dp"
            android:text="BODY" 
          android:textAppearance="?android:attr/textAppearanceLarge"
           android:textColor="#fff" />
    </LinearLayout>
</RelativeLayout>
/* FOOTER */
<RelativeLayout
    android:id="@+id/footer"
    android:layout_width="match_parent"
    android:layout_height="60dp"
    android:layout_alignParentBottom="true"
    android:layout_marginTop="10dp"
    android:background="#48fff7">
    <LinearLayout
        android:layout_width="match_parent"
       android:layout_height="match_parent"
        android:layout_alignParentLeft="true"
        android:layout_alignParentStart="true"
        android:layout_alignParentTop="true" 
       android:weightSum="1">
    </LinearLayout>
</RelativeLayout>
</RelativeLayout>

For futher any information or doubt please let me know..?

Select Image from Gallery or Capture through Camera and Store it in shared preferences and use it inside application in Android

First you need to convert image to Base64 String representation and then store it in shared 
preference as follows :

Bitmap realImage = BitmapFactory.decodeStream(stream);
ByteArrayOutputStream baos = new ByteArrayOutputStream();
realImage.compress(Bitmap.CompressFormat.JPEG, 100, baos);   
byte[] b = baos.toByteArray(); 

String encodedImage = Base64.encodeToString(b, Base64.DEFAULT);

textEncode.setText(encodedImage);

SharedPreferences shre = PreferenceManager.getDefaultSharedPreferences(this);

Editor edit=shre.edit();
edit.putString("image_data",encodedImage);
edit.commit();

and you can retrieve the image using Bitmap as :


SharedPreferences shre = PreferenceManager.getDefaultSharedPreferences(this);
String previouslyEncodedImage = shre.getString("image_data", "");

if( !previouslyEncodedImage.equalsIgnoreCase("") ){

    byte[] b = Base64.decode(previouslyEncodedImage, Base64.DEFAULT);
    Bitmap bitmap = BitmapFactory.decodeByteArray(b, 0, b.length);
    imageView.setImageBitmap(bitmap);
}

if You are using capturing image with camera or picking up from galleryin both way you can use this methods as :

private static final int CAPTURE_IMAGE = 0;
private static final int SELECT_PICTURE = 1;

and then implement this method :


public void onActivityResult(int requestCode, int resultCode, Intent data) {

    if (requestCode == CAPTURE_IMAGE) {
        Bitmap thumbnail = (Bitmap) data.getExtras().get("data");
        storeImage(thumbnail);
    } else if (requestCode == SELECT_PICTURE) {
        Uri mImageUri = data.getData();
        Bitmap thumbnail = MediaStore.Images.Media.getBitmap(getActivity().getContentResolver(), mImageUri);
        storeImage(thumbnail);
    }
}

and store Image method is as follows :

private void storeImage(Bitmap thumbnail) {

    // Removing image saved earlier in shared prefernces
    shre = PreferenceManager.getDefaultSharedPreferences(getActivity());
    SharedPreferences.Editor edit=shre.edit();
    edit.remove("image_data");
    edit.commit();

    ByteArrayOutputStream bytes = new ByteArrayOutputStream();

    thumbnail.compress(Bitmap.CompressFormat.JPEG, 100, bytes);
    File destination = new File(Environment.getExternalStorageDirectory(),
            System.currentTimeMillis() + ".jpg");
    FileOutputStream fo;
    try {
        destination.createNewFile();
        fo = new FileOutputStream(destination);
        fo.write(bytes.toByteArray());
        fo.close();
    } catch (FileNotFoundException e) {
        e.printStackTrace();
    } catch (IOException e) {
        e.printStackTrace();
    }
    imageview.setImageBitmap(thumbnail);
    byte[] b = bytes.toByteArray();
    String encodedImage = Base64.encodeToString(b, Base64.DEFAULT);
    //saving image to shared preferences
    edit.putString("image_data",encodedImage);
    edit.commit();
}

Saturday, March 5, 2016

Crop An Image in Android Programmatically


package zafar.android.cropimage;
import android.app.Activity;
import android.graphics.Bitmap;
import android.graphics.BitmapFactory;
import android.graphics.Canvas;
import android.graphics.Matrix;
import android.graphics.<span id="IL_AD8" class="IL_AD">Paint</span>;
import android.graphics.Path;
import android.graphics.<span id="IL_AD9" class="IL_AD">Rect</span>;
import android.graphics.RectF;
import android.graphics.drawable.BitmapDrawable;
import android.os.Bundle;
import android.view.MotionEvent;
import android.view.View;
import android.view.View.OnTouchListener;
import android.widget.AbsoluteLayout;
import android.widget.FrameLayout;
@SuppressWarnings({ "deprecation", "<span id="IL_AD10" class="IL_AD">unused</span>" })
public class Move extends Activity {
    public FrameLayout board;
    public View part1;
    @Override
    public void onCreate(Bundle savedInstanceState)
    {
        super.onCreate(savedInstanceState);
        setContentView(R.layout.main);
         board = new FrameLayout(this);
         board = (FrameLayout)findViewById(R.id.Board);
         part1 = <span id="IL_AD7" class="IL_AD">new View</span>(this);
         part1 = findViewById(R.id.part1);
        try{
            Paint paint = new Paint();
            paint.setFilterBitmap(true);
            Bitmap bitmapOrg = BitmapFactory.decodeResource(getResources(),R.drawable.image);
            int targetWidth  = 300;
            int targetHeight = 300;
            Bitmap targetBitmap = Bitmap.createBitmap(targetWidth, targetHeight,Bitmap.<span id="IL_AD2" class="IL_AD">Config</span>.ARGB_8888);
            RectF rectf = new RectF(0, 0, 100, 100);
            Canvas canvas = new Canvas(targetBitmap);
            Path path = new Path();
            path.addRect(rectf, Path.Direction.CW);
            canvas.clipPath(path);
            canvas.drawBitmap( bitmapOrg, new Rect(0, 0, bitmapOrg.getWidth(), bitmapOrg.getHeight()),
                            new Rect(0, 0, targetWidth, targetHeight), paint);
            <span id="IL_AD5" class="IL_AD">Matrix matrix</span> = <span id="IL_AD6" class="IL_AD">new Matrix</span>();
            matrix.postScale(1f, 1f);
            Bitmap resizedBitmap = Bitmap.createBitmap(targetBitmap, 0, 0, 100, 100, matrix, true);
            /*convert Bitmap to resource */
            BitmapDrawable bd = new BitmapDrawable(resizedBitmap);
            part1.setBackgroundDrawable(bd);
        }
        catch(Exception e){
            System.out.println("Error1 : " + e.getMessage() + e.toString());
      }
    }
main.xml
<?<span id="IL_AD11" class="IL_AD">xml version</span>="1.0" encoding="utf-8"?>
<FrameLayout
     xmlns:android="http://schemas.android.com/apk/res/android"
     android:layout_width="fill_parent"
     android:layout_height="fill_parent"
     android:id="@+id/Board"
     android:layout_gravity="top">
<View
        android:layout_height="100dp"
        android:layout_width="100dp"
        android:id="@+id/part1"
        >
</FrameLayout>


For further any exception, Let me know..